Basics
- Access your e-commerce website by visiting: www.yourwebsiteaddress.co.uk/login
Adding a product
Taxonomies
- As you would expect, product categories and tags can be applied before, or during the creation of a product.
- Attributes on the other hand are a little different – they can be added per-product, or you can set global attributes up for the entire store to use (for example in layered navigation).
Product Types
With attributes and categories set up and stock management configured, we can begin to actually add products. When adding your product the first thing to ascertain is which type of product it will be.
- The Simple product type covers the vast majority of any products you may sell. Simple products are shipped and have no options. For example, a can of drink.
- A Grouped product is a collection of related products which can be purchased individually. For example, a PS3 could be a grouped product as there are 80GB, 120GB and 200GB variations of that same parent product.
- An External or Affiliate product is one which you list and describe on your web site, but is sold elsewhere.
- A Variable product is a product which has several different variations, each of which may have a different SKU, price, stock options etc. For example a tshirt available in several different colours and/or sizes.
1. Adding a simple product
Adding a simple product is a straight forward process and not too dissimilar from authoring a standard Blogpost. In the Products menu click Add Product; you will be presented with a familiar interface, and should immediately see where to type the product title and full description.
- Under the main dialog box is the Product Type panel.
- Here you define the product type (as outlined above) and whether it is a downloadable (digital), orvirtual (service) product.
- Virtual products don’t require shipping – an order containing virtual products won’t calculate a shipping cost
Product data
Next is the Product Data tab set. This is where the majority of the product data is input.
General tab
SKU – stock keep unit, used to track products. Must be unique, and should be named so it does not clash with post ID’s.Price:
- Regular Price – The item’s main price.
- Sale Price – The item’s sale price.
Weight – Weight of the item.Dimensions – Length, width, and height for the item.Visibility – Can be set to:
- Catalog and search – visible everywhere
- Catalog – visible in catalog loops, but not search
- Search – visible in search results, but not in the catalog (categories/shop page)
- Hidden – only visible on the single product page – not in any product loops
Featured – Is the product featured or not?
Tax tab
- In the tax tab you define the products tax status and if you’ve set up additional tax classes, which tax class the product belongs to.
Inventory tab
- The inventory tab allows you to manage stock for the product individually and define whether to allow back orders.
- If stock management is disabled from the settings page, only the ‘stock status’ option will be visible.
Up-sells/cross-sells tab
- Using up-sells and cross-sells you can cross promote your products with one another.
- They can be added by searching for a particular product, then clicking the ‘Up-sell’ or ‘Cross-sell’ button in the search results:
- After adding them, they will be listed on the right side of the panel:
Up-sells are displayed on the product details page.
- These are products which you may wish to encourage users to upgrade to based on the product they are currently viewing.
- For example if the user is viewing the Nintendo DS product listing page, you may want to display the Nintendo 3DS on that same page as an up-sell.
Cross-sells are products which are displayed at the cart and related to the users cart contents.
- As an example if the user adds a Nintendo DS to their cart, when the arrive at the cart page you may want to suggest that they also purchase spare Styluses.
Attributes tab
On the attributes tab you can assign attributes to a product. You will see a select box containing any global attribute sets you may have created (E.G. platform). See Setting up atttributes for help on setting these up.
- Once you have selected an attribute from the select box, click add and you will be able to apply the terms attached to that attribute (E.G. Nintendo DS) to the product.
- You can choose to hide the attribute on the frontend by simply leaving the ‘Visible’ checkbox unticked.
- Custom attributes can be applied here too by choosing ‘Custom product attribute’ from the select box. These are added at the product level and won’t be available in the layered navigation.
Grouping tab
The grouping tab lets you assign your simple product to a grouped product if one exists. You can also set the sort order if you want the product to appear in a specific order when viewing the grouped product.
Excerpt
Finally you can add an excerpt which should be a short description of the product. Typically this will appear next to the product imagery on the listing page whilst the long description will appear within the Product Description tab.
Taxonomies
On the right hand side of the Add New Product panel you will see your product categories in which you can place your product, just like a standard Blogpost. You can also assign the product tags in the same manner.
Product images
You can add both a main image and a gallery of images
Adding a grouped product
A grouped product is created in much the same way as a simple product. The only difference in fact is choosing “Grouped” from the Product Type dropdown in the General tab. Upon choosing this the price several fields will disappear, this is fine, you’ll be adding these fields to the individual child products. Once you’re happy with the grouped (parent) product, publish it and come back to the Add New Product page.Now you need to add the child product which sits within the grouped product. The only information you’re required to fill in here is the following:
- Title. E.G. Playstation 3 80 GB
- Product Type (simple)
- Parent post (inside the Group tab). Choose your parent (E.G. Playstation 3) from the selectbox
Adding a virtual product
When adding a simple product, you can check the ‘virtual‘ box in the product type panel. This will remove un-necessary fields (such as dimensions).
Adding a downloadable product
When adding a simple product, you can check the ‘downloadable‘ box in the product type panel. This will add two new fields:
- File path – path or url to your downloadable file.
- Download limit – a limit for the number of times the customer can download the file. Left blank for unlimited downloads.
- For maximum flexibility, downloadable products also incur a shipping cost (if for example you were offering both a packaged version, and a downloadable version of a product this would be ideal).
- You can also check the ‘virtual’ box if the downloadable product is not shippable.
Adding an external product
Choose ‘External/Affiliate’ from the product type drop down. This will remove unnecessary tabs such as tax and inventory and insert a new product URL field. This is the destination at which users can purchase the product. Rather than add to cart buttons, they will see a read more button directing them to this URL.
Adding a variable product
Variable products are arguably the most complex of product types. They let you define variations of a single product where each variation may have a different SKU, price or stock level.[/toggle][toggle title=Managing orders]
Viewing orders
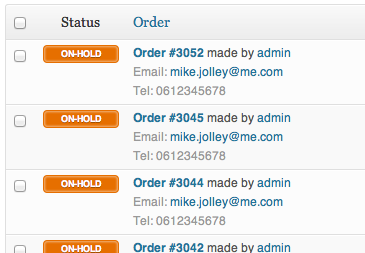
When you start taking orders the order management page will begin to fill up. You can view these orders by going to Commerce > Orders in the left hand admin menu.
Each order row displays useful details such as the customers address, their email, telephone number, and the order status. You can click on the orders number or the ‘view order’ button to see the single order page (this is also where you can edit the order details and update the status).The order statuses let you know how far along the order is, starting from pending and ending with complete. The following order statuses are used:
- Pending – Order received (unpaid)
- Failed – Payment failed or was declined (unpaid)
- Processing – Payment received and stock has been reduced- the order is awaiting fulfilment
- Completed – Order fulfilled and complete – requires not further action
- On-Hold – Awaiting payment – stock is reduced, but you need to confirm payment
- Cancelled – Cancelled by an admin or the customer – no further action required
- Refunded – Refunded by an admin – no further action required
You can filter the list of displayed orders by date, status and customer by using the form at the top of the screen:
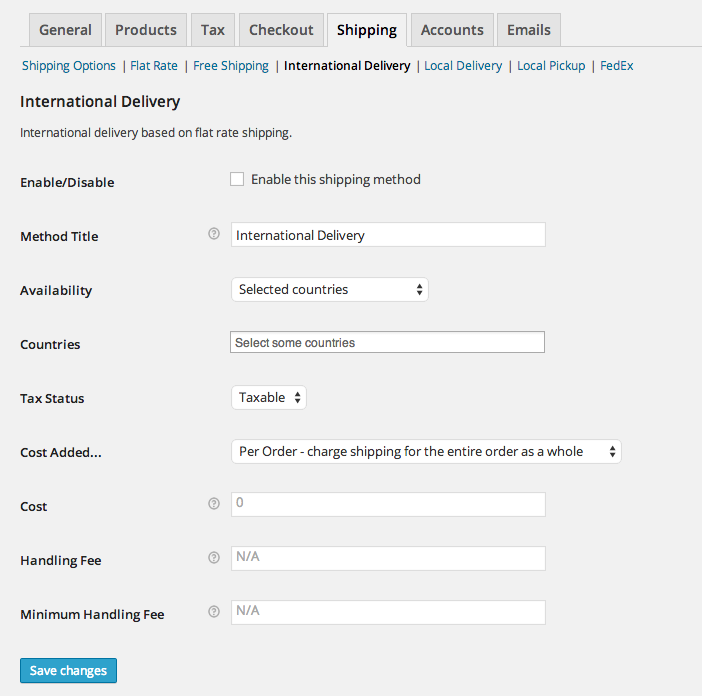
International Shipping is based on Flat Rate Shipping which allows you define a standard rate per order, per item or per shipping class for international delivery. You will find the settings page in Shop > Settings> Shipping > International Delivery.
Configuration
- Enable/Disable – Check the box to enable International Delivery.
- Method Title – Give the method a title – this is what the customer will see when selecting a shipping method.
- Method availability – Define ‘Selected countries’ or ‘Excluding selected countries’.
- Tax Status – Define whether tax is applied to the shipping amount or not.
- Cost Added – ‘Per order’, ‘per item’ or ‘per class’.
- Cost, Handling and Minimum Handling – optionally enter amounts for each option.
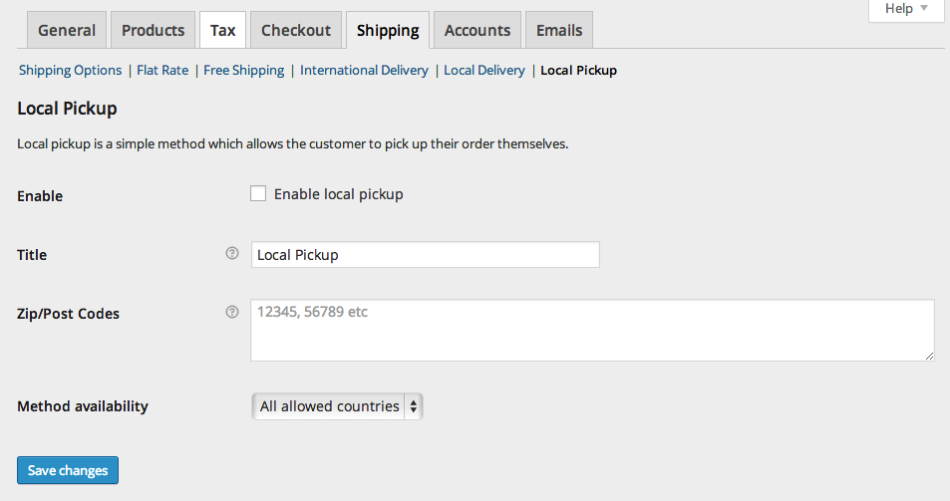
Local pickup is a simple method which allows the customer to pick up their order themselves.
You can enable & configure Local pickup from Dashboard -> SHOP -> Settings -> Shipping -> Local Pickup
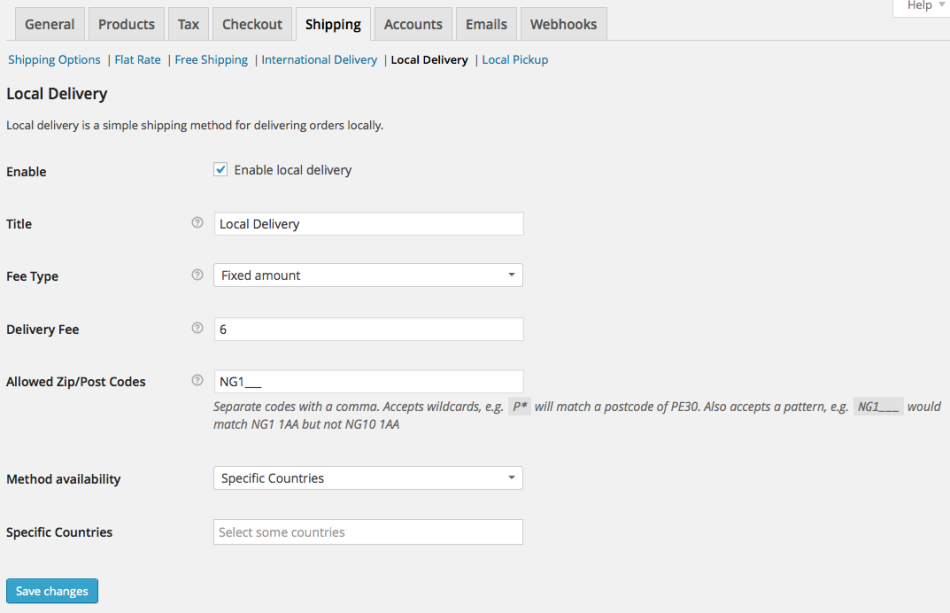
Local delivery is a simple shipping method for delivering orders locally. The fee can be specified based on a percentage of the cart total, a flat fee, or it can be free.
If you enable free shipping customers will have access to free shipping on their orders. This is a great shipping method to use to encourage customers to spend more. For example, give them free shipping on orders over $100.
Be sure you give it a Method Title and set a Method Availability. In Method Availability you can choose All allowed countries, letting any customer from any country be eligible for free shipping, or Specific Countries. If you choose Specific Countries a new field titled Specific Countries will appear you can use to limit free shipping to.
You can then specify a conditions they must meet to be granted free shipping in the Free Shipping Requires… Those are;
- N/A – Not available, Free Shipping is an option for all customers
- A valid free shipping coupon – A coupon created that enables free shipping
- A minimum order amount (defined below) – Set the amount in the Minimum Order Amount field.
- A minimum order amount OR a coupon
- A minimum order amount AND a coupon
Setting up Free Shipping Coupons
Step 1, create a coupon
First you need a coupon (see Coupon Management). Whilst adding that coupon, check the free shipping box:
Step 2, enable free shipping for coupons
In ‘free shipping’ settings, check the option to require a free shipping coupon. Thats it! Customers can now use your coupon to get free shipping during checkout.
Coupon vs Min Amount Handling
If you have coupons for free shipping and min-amount, coupons will take priority. If the user has a coupon, the min-amount will be ignored. If however the user doesn’t have a coupon, min-amount will be checked.
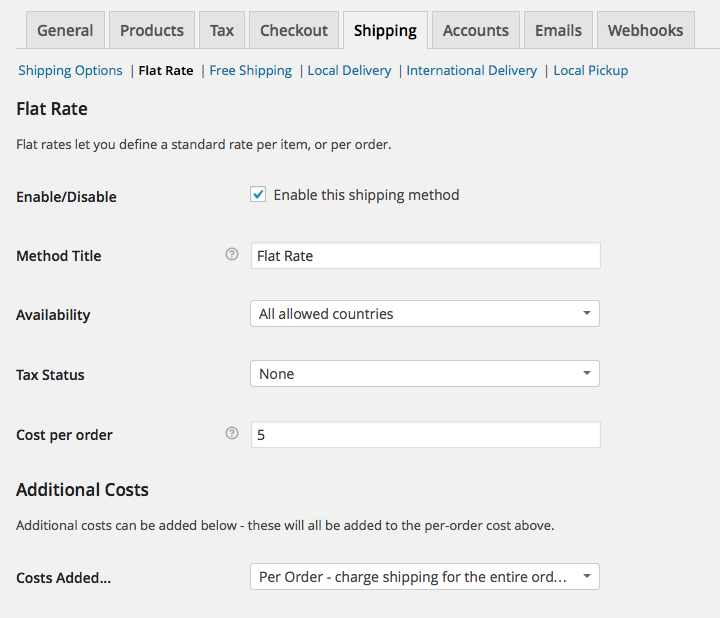
Flat rates is a bundled shipping method which allows you define a standard rate per item, per shipping class or per order. You will find the settings page in WooCommerce > Settings> Shipping > Flat Rates.
Flat Rates works with Product Shipping Classes adding more power and flexibility.
Configuration
- Enable/Disable – Check the box to enable Flat Rates.
- Method Title – Give the method a title – this is what the customer will see when selecting a shipping method.
- Method availability – Define ‘All allowed countries’ or ‘specific countries’ to limit where Flat Rates is offered.
- Tax Status – Define whether tax is applied to the shipping amount or not.
- Cost per order – Define a flat shipping cost applied to the cart as a whole.
Additional Rates
The additional rates field lets you apply a few extra rates on top of the base flat rate. Define each additional rate on its own line in the format:
Option Name | Additional Cost | Per-cost type (order, class or item)
Option name will be used instead of the main flat rate method title.
Additional cost will be added to the “cost per order” and any other costs defined in flat rate shipping.
Per-cost type can be set to ‘order’, ‘class’ or ‘item’ and controls how the additional cost is applied. e.g. with an additional cost of 9.99, ‘order’ would apply 9.99 to the entire order, ‘class’ would apply 9.99 multiplied by the number of shipping classes present in the cart, and ‘item’ would apply 9.99 multiplied by the quantity of items in the cart.
As an example, with flat rate shipping being £10, and the following additional rates:
Priority | 5 | order
Express | 10 | order
The following rates would be selectable by customers:
- Flat rate £10
- Priority £15
- Express £20
Here is an example of how this looks in the settings:
And here is another example to demonstrate a % for the additional rate:
Slow Rate | 9.95 - 0.2% | order
Mildly Fast Rate | 9.95 | order
Really Fast Rate | 9.95 + 0.2% | order
In this example:
- The ‘Slow Rate’ is going to add $9.95 – .2% to the entire order.
- The ‘Mildly Fast Rate’ will add $9.95 to the base flat rate shipping.
- The ‘Really Fast Rate’ will add $9.95 + 0.2% to the entire order.
Additional Costs
At the bottom of the flat rates screen there is a table for defining additional costs. These are added to all flat rates.
Costs Added defines how your additional costs are applied; either per order, multiplied by the number of shipping classes, or multiplied by the number of items.
Costs is a table where you define your actual costs, per shipping class:
- The ‘Shipping class’ column refers to the shipping class of items in the cart.
- The ‘any class’ row will apply unless you define a cost for a products shipping class.
- The ‘Cost’ column must be a numeric cost, exclusive of tax.
- The ‘Handling Fee’ column can be numeric or a percentage (e.g. 5%) which would be applied to the value of the items in that shipping class.
Minimum Handling Fee can also be set to ensure this minimum is charged when applying fees. This is useful when using percentage based fees.

