
Variable products are a great feature of your store for offering variations of a product with different prices, stock and more. They can be used for offering variations of a product e.g. a large t-shirt vs a small t-shirt. Each variation can have different properties and prices.
Adding attributes for variations
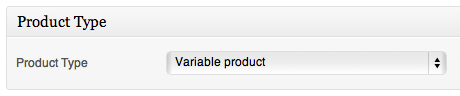
Set the product type
To add a variable product first selection the type ‘variable’ from the product type dropdown. The interface will change to reflect your selection.
Choose the variation type
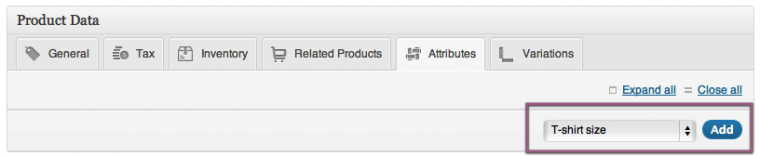
Define variation attributes
On the attributes tab add some attributes to your product – you can use global attributes or define some custom ones specific for your product.
Add your attribute to the productMake sure to assign all values of the attribute to the variable product which will become options and check the ‘variation’ checkbox on each attribute to tell your shop its for your variations:
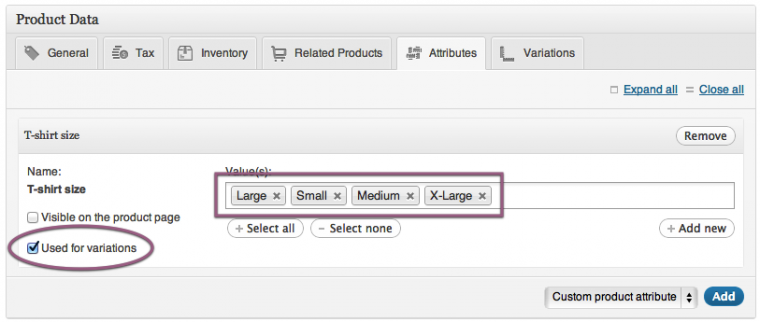
Add attributes and ensure the variations checkbox is checked
Add variations
After saving your product you can now begin to add variations, or link all possible variations. To add a variation, click the ‘add variation’ button. A new blank row will appear ready for you to input the data.
A new variationEach variation of a product may be assigned the following data:
- An image – click the icon to see the image uploader. After you choose an image click ‘insert into post’.
- SKU – Set the SKU for the variation, or leave blank to use the parent products SKU.
- Stock quantity - Stock for the particular variation, or left blank to use the parents stock settings.
- Weight - The weight for the variation, or left blank to use the parents weight.
- Dimensions – The dimensions for the variation, or left blank to use the parents dimensions.
- Price - The variations price. Required.
- Sale price - The variations sale price.
- Downloadable - If this variation is a downloadable product, check the box. You can then input file URL and download limits.
- Virtual - If the variation is virtual, check the box.
- Enabled – Uncheck the box to disable the variation. It will no longer be available.
- Shipping class – Shipping class can affect shipping. Set this if it differs from the parent.
- Tax class – A tax class for this variation. Useful if you are offering variations spanning different tax bands.
If the sku, weight, dimension, and stock fields are not set then it simply inherits the values assigned to the parent variable product.Price fields must be set per product.
Bulk editing
Above the variations you have access to some bulk editing tools to speed up data input:
![]()
Bulk edit variations
Linking possible variations
Instead of adding each variation one at a time, you can click the ‘link all variations’ button. This will create a new variation for each and every possible combination of variation attributes (max 50 per run).So if your example you had 2 attributes – colour (with values blue and green) and size (with values large and small) it will create the following variations:
- Large Blue
- Large Green
- Small Blue
- Small Green
Setting default variations
On the frontend, variations need to be selected before an add to cart button is displayed. However, if you define a default variation to use then it will be displayed immediately:![]()
The result: Frontend
On the frontend, when viewing a variable product, the user will be presented with dropdown boxes to select the variation options; selecting options will reveal the stock, price and add to cart button for the variation so the user can purchase the product. The user will only be able to select variations that exist (and that are enabled) – non-existing variations will be greyed out. (see above) Variations are shown as drop down selectors on the front-end
Setting up Color and Image Swatches for Global Product Attributes
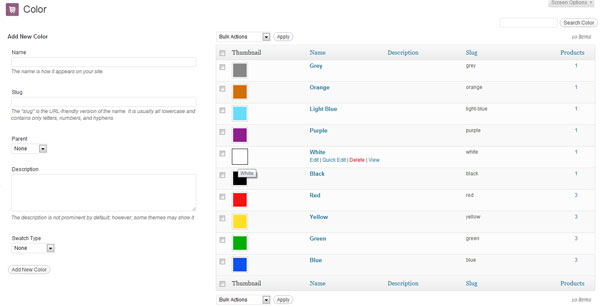
Color and Image swatches are configured for global product attributes, much the same way that the store handles adding an image to a Product CATEGORY.Setting up global colors and swatches uses an interface you will be familiar with. It’s recommended that you set up any color or image swatches you will be using over and over in this way. Navigate to Products > Attributes and you will be presented with the following screen:
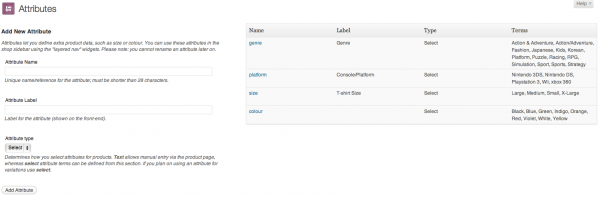
Create or choose a product attribute set to start configuring the swatches. For more information about setting up and managing Global Product Attributes – In the example below we’ve configured a Color attribute and have setup the colors on our existing terms.
When creating a new term for this attribute, you will have the ability to choose a color swatch or image.

When editing an existing term, you will also have the ability to remove or change the swatch information.

Once you have configured your Global Product Attribute Colors and Images you need to enable the swatch picker on each product you would like to use them on.You also have the option to create color and image swatches on a per product basis, to override the global configuration, or choosing them for product specific attributes.
Setting up Color and Image Swatches Per Product
The first step in using Color and Image swatches is to setup product attributes and configure a variable product. You can use global attributes, per product attributes or a combination of both.
Setting up swatches for your product variations
Once you have created product variations you will see a new tab on the Product Data area called “Swatches”. This is where we configure the product to use our product attribute colors and swatches, configure product specific colors and images, and optionally override the defaults from a global attribute.
Enabling Global Color and Image Swatches on the Product
Expand the attribute you would like to configure and choose Global Colors and Image Swatches from the Type dropdown. This option will use the swatch configuration you have previously setup for this global attribute. Publish your changes to enable the pickers on the product.

Enabling Per Product Color and Image Swatches
Per Product color and image swatches are used when you need to configure swatches that are different from the global setup, or if you want to add swatches to a per product attribute. Get started by expanding the attribute you want to configure, and choose Custom Colors and Images.

The screen will expand to show you each term that has been configured for the attribute, allowing you to choose a custom color or image for the attribute term. Click on the term to expand the options, allowing you change the settings for this individual item

Configure each term according to your requirements and publish when finished.

Order Status
The order statuses let you know how far along the order is, starting from pending and ending withcomplete. The following order statuses are used:
- Pending – Order received (unpaid)
- Failed – Payment failed or was declined (unpaid)
- Processing – Payment received and stock has been reduced- the order is awaiting fulfilment
- Completed – Order fulfilled and complete – requires not further action
- On-Hold – Awaiting payment – stock is reduced, but you need to confirm payment
- Cancelled – Cancelled by an admin or the customer – no further action required
- Refunded – Refunded by an admin – no further action required
Payment processing modules
a) Paypal standard
- The order is placed onsite
- Confirm button sends customer to the Paypal hosted checkout screen
- Order is set within admin to Pending status – Order received but unpaid
- Customers can pay via Paypal account credit or by Card
- Upon completion of payment, order status is set (via auto IPN signal from paypal API) toProcessing status– Payment received – the order is awaiting fulfilment
- You need to deliver the order and set the order’s status to Completed
b) Paypal pro
- The order is placed onsite
- Card Payment details are entered onsite
- Confirm button completes payment process and sets order status to Processing – Payment received and stock has been reduced- the order is awaiting fulfilment
- You need to deliver the order and set the order’s status to Completed
c) Google Checkout
- The order is placed onsite
- Confirm button sends customer to the Google hosted checkout screen
- Order is set within admin to Pending status – Order received but unpaid
- Customers can pay via Google checkout account credit or by Card
- Upon completion of payment, order status is set (via auto IPN signal from Google API) toProcessing status– Payment received – the order is awaiting fulfilment
- You need to deliver the order and set the order’s status to Completed
- But In some situations you may be too busy to research and find costings for the various shipping suppliers – so please ask if you would like us to research the various options and setup your shipping costs on your behalf – this will incur additional admin charges.
- The selection of shipping rate prices and updates to prices is not included in your website design cost
- Initial setup of your chosen shipping rate system is included in your website design cost, but you will need to then enter the prices, depending on your choice of Shipping system on the website.
How to choose your shipping carrier
- In general most clients use Royal Mail shipping to post items, but you may find other carriers offer better prices for larger items and bulky orders -eg: Parcelforce, MyHermes etc.
- Once you have chosen your shipping carrier,we will guide you in entering the pricing details for your chosen carrier.
Your Alloy Shop website comes with 2 shipping options by default:
- Flat rate shipping – All items ship at the same flat price each, or all full orders have the same flat rate price Eg: Every order is £2.99 shipping, OR every item is £2.99 shipping each. This system works well for companies with a wide range of products that are similar weights and dimensions.
- Class shipping – Product shipping classes allow you to group similar products for shipping. They work in much the same way as product and post categories.Different groupings or classes of items have their own flat rate shipping costs each. For example you could input the following classes and a price for each: small parcel, large parcel, small box, large box. Then every product in the store needs to be assigned a shipping class, you can then specify a price for each shipping class at checkout the shipping costs for all items will be combined. You can also specify a handling charge to be added to all order totals. This system works well for small websites with only a few products.
Optional Website Shipping System Upgrades
- Advanced Weight Based Shipping (£80 setup + £30 year subscription for the price feed) This shipping upgrade enables weight based shipping calculations to be calculated at the checkout, with interactive shipping calculator. You will need to enter the weight bands and associated costs for them to be input into the system. International shipping price bands can be specified with this system. You will need to enter rates in the following format: 1.1kg – 2kg = £1.59, 2.01kg – 3kg = £2.49
- Royal Mail Shipping Prices (£60 setup + £30 year subscription for the price feed) – Simply enter the weight an dimensions of all products when setting up, then this system will calculate all shipping prices based on Royal Mails most recent pricing feeds including international prices.
- Royal Mail & Parcelforce Shipping Prices (£70 setup + £40 year subscription for the price feeds) – Simply enter the weight and dimensions of all products when setting up, then this system will calculate all shipping prices based on Royal Mail and Parcelforce’s most recent pricing feeds
Basics
- Access your e-commerce website by visiting: www.yourwebsiteaddress.co.uk/login
Adding a product
Taxonomies
- As you would expect, product categories and tags can be applied before, or during the creation of a product.
- Attributes on the other hand are a little different – they can be added per-product, or you can set global attributes up for the entire store to use (for example in layered navigation).
Product Types
With attributes and categories set up and stock management configured, we can begin to actually add products. When adding your product the first thing to ascertain is which type of product it will be.
- The Simple product type covers the vast majority of any products you may sell. Simple products are shipped and have no options. For example, a can of drink.
- A Grouped product is a collection of related products which can be purchased individually. For example, a PS3 could be a grouped product as there are 80GB, 120GB and 200GB variations of that same parent product.
- An External or Affiliate product is one which you list and describe on your web site, but is sold elsewhere.
- A Variable product is a product which has several different variations, each of which may have a different SKU, price, stock options etc. For example a tshirt available in several different colours and/or sizes.

1. Adding a simple product
Adding a simple product is a straight forward process and not too dissimilar from authoring a standard Blogpost. In the Products menu click Add Product; you will be presented with a familiar interface, and should immediately see where to type the product title and full description.
- Under the main dialog box is the Product Type panel.
- Here you define the product type (as outlined above) and whether it is a downloadable (digital), orvirtual (service) product.
- Virtual products don’t require shipping – an order containing virtual products won’t calculate a shipping cost
Product data
Next is the Product Data tab set. This is where the majority of the product data is input.
General tab
SKU – stock keep unit, used to track products. Must be unique, and should be named so it does not clash with post ID’s.Price:
- Regular Price – The item’s main price.
- Sale Price – The item’s sale price.
Weight – Weight of the item.Dimensions – Length, width, and height for the item.Visibility – Can be set to:
- Catalog and search – visible everywhere
- Catalog – visible in catalog loops, but not search
- Search – visible in search results, but not in the catalog (categories/shop page)
- Hidden – only visible on the single product page – not in any product loops
Featured – Is the product featured or not?
Tax tab
- In the tax tab you define the products tax status and if you’ve set up additional tax classes, which tax class the product belongs to.
Inventory tab
- The inventory tab allows you to manage stock for the product individually and define whether to allow back orders.
- If stock management is disabled from the settings page, only the ‘stock status’ option will be visible.
Up-sells/cross-sells tab
- Using up-sells and cross-sells you can cross promote your products with one another.
- They can be added by searching for a particular product, then clicking the ‘Up-sell’ or ‘Cross-sell’ button in the search results:
- After adding them, they will be listed on the right side of the panel:
Up-sells are displayed on the product details page.
- These are products which you may wish to encourage users to upgrade to based on the product they are currently viewing.
- For example if the user is viewing the Nintendo DS product listing page, you may want to display the Nintendo 3DS on that same page as an up-sell.
Cross-sells are products which are displayed at the cart and related to the users cart contents.
- As an example if the user adds a Nintendo DS to their cart, when the arrive at the cart page you may want to suggest that they also purchase spare Styluses.
Attributes tab
On the attributes tab you can assign attributes to a product. You will see a select box containing any global attribute sets you may have created (E.G. platform). See Setting up atttributes for help on setting these up.
- Once you have selected an attribute from the select box, click add and you will be able to apply the terms attached to that attribute (E.G. Nintendo DS) to the product.
- You can choose to hide the attribute on the frontend by simply leaving the ‘Visible’ checkbox unticked.
- Custom attributes can be applied here too by choosing ‘Custom product attribute’ from the select box. These are added at the product level and won’t be available in the layered navigation.
Grouping tab
The grouping tab lets you assign your simple product to a grouped product if one exists. You can also set the sort order if you want the product to appear in a specific order when viewing the grouped product.
Excerpt
Finally you can add an excerpt which should be a short description of the product. Typically this will appear next to the product imagery on the listing page whilst the long description will appear within the Product Description tab.
Taxonomies
On the right hand side of the Add New Product panel you will see your product categories in which you can place your product, just like a standard Blogpost. You can also assign the product tags in the same manner.
Product images
You can add both a main image and a gallery of images
Adding a grouped product
A grouped product is created in much the same way as a simple product. The only difference in fact is choosing “Grouped” from the Product Type dropdown in the General tab. Upon choosing this the price several fields will disappear, this is fine, you’ll be adding these fields to the individual child products. Once you’re happy with the grouped (parent) product, publish it and come back to the Add New Product page.Now you need to add the child product which sits within the grouped product. The only information you’re required to fill in here is the following:
- Title. E.G. Playstation 3 80 GB
- Product Type (simple)
- Parent post (inside the Group tab). Choose your parent (E.G. Playstation 3) from the selectbox
Adding a virtual product
When adding a simple product, you can check the ‘virtual‘ box in the product type panel. This will remove un-necessary fields (such as dimensions).
Adding a downloadable product
When adding a simple product, you can check the ‘downloadable‘ box in the product type panel. This will add two new fields:
- File path – path or url to your downloadable file.
- Download limit – a limit for the number of times the customer can download the file. Left blank for unlimited downloads.
- For maximum flexibility, downloadable products also incur a shipping cost (if for example you were offering both a packaged version, and a downloadable version of a product this would be ideal).
- You can also check the ‘virtual’ box if the downloadable product is not shippable.
Adding an external product
Choose ‘External/Affiliate’ from the product type drop down. This will remove unnecessary tabs such as tax and inventory and insert a new product URL field. This is the destination at which users can purchase the product. Rather than add to cart buttons, they will see a read more button directing them to this URL.
Adding a variable product
Variable products are arguably the most complex of product types. They let you define variations of a single product where each variation may have a different SKU, price or stock level.
Variable products are a great feature of your store for offering variations of a product with different prices, stock and more.
- They can be used for offering variations of a product e.g. a large t-shirt vs a small t-shirt.
- Each variation can have different properties, weight, special offers and prices.
- The customer visits the product page, then chooses the variation from the drop-down selector boxes.
Adding attributes for variations
Visit the edit product page for the product you want to add variations to.
Set the product type
- To add a variable product first selection the type ‘variable’ from the product type dropdown.
- The interface will change to reflect your selection.
Define variation attributes
- On the attributes tab add some attributes to your product
- you can use global attributes (if many products have the same attributes, for example a t-shirt shop might offer the same attributes for all products – size:Small, size:medium, size: large) this saves you some time by setting up The Global attribute: Size – And setting the variations small/Medium/Large. You can then apply these global attributes to each product easily.
- Alternatively, if you have lots of different products and no common attributes, you can define some custom attribute variations specific to each product
Add your attribute to the product
- Make sure to assign all values of the attribute to the variable product which will become options
- and check the ‘variation’ checkbox on each attribute to tell your shop its for your variations:
- Add attributes and ensure the variations checkbox is checked as shown below
At this point you need to save your product – by clicking in the top right of the page – either Update Draft or if already published the product Update
Add variations
- After saving your product you can now begin to add variations, or link all possible variations.
- To add a variation, click the ‘add variation’ button. A new blank row will appear ready for you to input the data.
A new variation
Each variation of a product may be assigned the following data:
- An image – click the icon to see the image uploader. After you choose an image click ‘insert into post’. This will override the mainFeatured image for the product if already set.
- SKU – Set the SKU for the variation, or leave blank to use the parent product”s SKU.
- Stock quantity - Stock for the particular variation, or left blank to use the parents stock settings.
- Weight - The weight for the variation, or left blank to use the parents weight.
- Dimensions – The dimensions for the variation, or left blank to use the parents dimensions.
- Price - The variations price. Required.
- Sale price - The variations sale price.
- Downloadable - If this variation is a downloadable product, check the box. You can then input file URL and download limits.
- Virtual - If the variation is virtual, check the box.
- Enabled – Uncheck the box to disable the variation. It will no longer be available.
- Shipping class – Shipping class can affect shipping. Set this if it differs from the parent.
- Tax class – A tax class for this variation. Useful if you are offering variations spanning different tax bands.
If the sku, weight, dimension, and stock fields are not set then it simply inherits the values assigned to the parent variable product.Price fields must be set per product.
Bulk editing
Above the variations you have access to some bulk editing tools to speed up data input:
![]()
Bulk edit variations
Linking possible variations
- Instead of adding each variation one at a time, you can click the ‘link all variations’ button.
- This will create a new variation for each and every possible combination of variation attributes (max 50 per run).
- So if your example you had 2 attributes – colour (with values: blue and green) and size (with values large and small) it will create the following variations:
- Large Blue
- Large Green
- Small Blue
- Small Green
Setting default variations
On the frontend, variations need to be selected before an add to cart button is displayed. However, if you define a default variation to use then it will be displayed immediately:![]()
The result: Frontend
On the frontend, when viewing a variable product, the user will be presented with dropdown boxes to select the variation options; selecting options will reveal the stock, price and add to cart button for the variation so the user can purchase the product. The user will only be able to select variations that exist (and that are enabled) – non-existing variations will be greyed out.(see above) Variations are shown as drop down selectors on the front-end
Basics
- Access your e-commerce website by visiting: www.yourwebsiteaddress.co.uk/login
Managing orders
Viewing orders
When you start taking orders the order management page will begin to fill up. You can view these orders by going to Shop > Orders in the left hand admin menu.

Each order row displays useful details such as the customers address, their email, telephone number, and the order status. You can click on the orders number or the ‘view order’ button to see the single order page (this is also where you can edit the order details and update the status).The order statuses let you know how far along the order is, starting from pending and ending with complete. The following order statuses are used:
- Pending – Order received (unpaid)
- Failed – Payment failed or was declined (unpaid)
- Processing – Payment received and stock has been reduced- the order is awaiting fulfilment
- Completed – Order fulfilled and complete – requires not further action
- On-Hold – Awaiting payment – stock is reduced, but you need to confirm payment
- Cancelled – Cancelled by an admin or the customer – no further action required
- Refunded – Refunded by an admin – no further action required
Tips
You can filter the list of displayed orders by date, status and customer by using the form at the top of the screen:

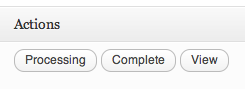
Order rows also have some handy shortcut buttons for marking orders complete and processing, should you want to do so quickly:
Editing/viewing single orders
From the single order page not only can you view all order data, you can edit and update it. You can:
- Change the order status
- Edit order items – modify the product, prices, and taxes
- Stock – Reduce and restore stock for an order
- Invoice – Emails the customer order details and a payment link – very handy if manually creating an order for somebody from within your webshop – and especially useful if you are using your webshop’s built in inventory/stock control and low stock alerts system.
Order Data
The order data panel lets you modify the order status, view (or change) the customers order note, and change which user the order is assigned to.

On the right of the order data panel you’ll find the customers billing and shipping addresses. To edit the addresses click ‘edit’ and a form will be revealed. Once saved, the new address will be displayed, in a localised format.
Order Items
The next panel on the order page is the order items panel. This panel lists items which are in the order, as well as quantities and prices.
The editable parts of line items include:
- Tax Class – Tax class for the line. This may be adjusted if, for example, the customer is tax exempt.
- Quantity – The quantity of the item the user is purchasing
- Line Subtotal – Line price and line tax before pre-tax discounts
- Line Total – Line price and line tax after pre-tax discounts
There are two buttons available on this panel – calc line tax and calc totals. Calculating line tax will use your prices, and calculate the tax based on the customers shipping address. If the customer’s address has not been input, it will default to the stores base location.Calculating the totals will fill in certain parts in the order totals panel.
Order Totals
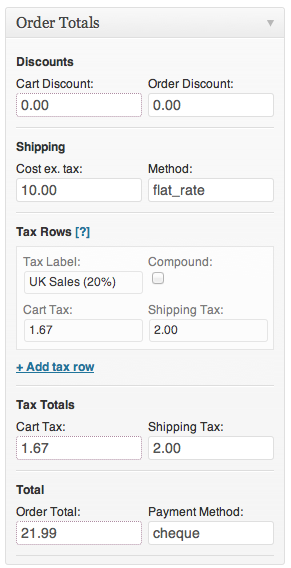
The order totals panel stores totals and tax for the order. You can enter these values yourself or have them part calculated for you using the ‘calc totals’ button. The totals comprise of the following:
- Cart Discount – pre-tax discounts. Can be auto-calculated.
- Order Discount – post-tax discounts. Need to be input manually.
- Shipping cost – cost excluding tax.
- Shipping method – name of the method.
- Cart tax – cart tax total.
- Shipping tax – shipping tax total.
- Order total
- Payment method – name of the payment method used.
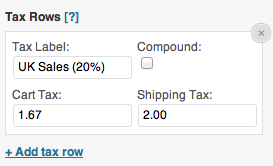
There is also a section called tax rows. This is where you can define (and name) multiple tax rows. This is useful if, for example, you take multiple taxes or use compound taxes. These values are displayed on the customer invoice.
Adding an order manually
Add an order using the ‘Add New’ link at the top of the orders page. Once added you can input the customer details, add line items, and calculate the totals. You should set a relevant status for the new order – if it needs to be paid use ‘pending’.After saving, you can use the ‘Email Invoice’ link to email the customer the order details and a payment link. Simple!
Order/Customer Notes
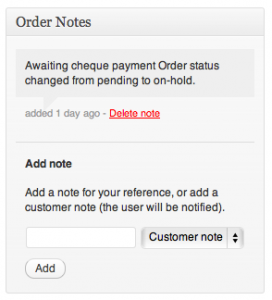
The ‘Order Notes’ panel displays notes attached to the order. These are used for storing event details, such as payment gateway “callback” results or reducing stock levels, and for adding notes to the order for customers to view. Some payment gateways also add notes for debugging.
Using notes to communicate with customers
The notes feature can be a very powerful tool for communicating with customers. Need to add a tracking number for shipping? Some stock is delayed? Add a customer note and they will be automatically notified.When added, customer notes are highlighted in purple. Customers receive notes via email, but can view them by viewing an order, or using the Shop order tracking page. Alternatively you could make a note “Private” so only you can read the note.

Basics
- Access your e-commerce website by visiting: www.yourwebsiteaddress.co.uk/login
Adding a product
Taxonomies
- As you would expect, product categories and tags can be applied before, or during the creation of a product.
- Attributes on the other hand are a little different – they can be added per-product, or you can set global attributes up for the entire store to use (for example in layered navigation).
Product Types
With attributes and categories set up and stock management configured, we can begin to actually add products. When adding your product the first thing to ascertain is which type of product it will be.
- The Simple product type covers the vast majority of any products you may sell. Simple products are shipped and have no options. For example, a can of drink.
- A Grouped product is a collection of related products which can be purchased individually. For example, a PS3 could be a grouped product as there are 80GB, 120GB and 200GB variations of that same parent product.
- An External or Affiliate product is one which you list and describe on your web site, but is sold elsewhere.
- A Variable product is a product which has several different variations, each of which may have a different SKU, price, stock options etc. For example a tshirt available in several different colours and/or sizes.
1. Adding a simple product
Adding a simple product is a straight forward process and not too dissimilar from authoring a standard Blogpost. In the Products menu click Add Product; you will be presented with a familiar interface, and should immediately see where to type the product title and full description.
- Under the main dialog box is the Product Type panel.
- Here you define the product type (as outlined above) and whether it is a downloadable (digital), orvirtual (service) product.
- Virtual products don’t require shipping – an order containing virtual products won’t calculate a shipping cost
Product data
Next is the Product Data tab set. This is where the majority of the product data is input.
General tab
SKU – stock keep unit, used to track products. Must be unique, and should be named so it does not clash with post ID’s.Price:
- Regular Price – The item’s main price.
- Sale Price – The item’s sale price.
Weight – Weight of the item.Dimensions – Length, width, and height for the item.Visibility – Can be set to:
- Catalog and search – visible everywhere
- Catalog – visible in catalog loops, but not search
- Search – visible in search results, but not in the catalog (categories/shop page)
- Hidden – only visible on the single product page – not in any product loops
Featured – Is the product featured or not?
Tax tab
- In the tax tab you define the products tax status and if you’ve set up additional tax classes, which tax class the product belongs to.
Inventory tab
- The inventory tab allows you to manage stock for the product individually and define whether to allow back orders.
- If stock management is disabled from the settings page, only the ‘stock status’ option will be visible.
Up-sells/cross-sells tab
- Using up-sells and cross-sells you can cross promote your products with one another.
- They can be added by searching for a particular product, then clicking the ‘Up-sell’ or ‘Cross-sell’ button in the search results:
- After adding them, they will be listed on the right side of the panel:
Up-sells are displayed on the product details page.
- These are products which you may wish to encourage users to upgrade to based on the product they are currently viewing.
- For example if the user is viewing the Nintendo DS product listing page, you may want to display the Nintendo 3DS on that same page as an up-sell.
Cross-sells are products which are displayed at the cart and related to the users cart contents.
- As an example if the user adds a Nintendo DS to their cart, when the arrive at the cart page you may want to suggest that they also purchase spare Styluses.
Attributes tab
On the attributes tab you can assign attributes to a product. You will see a select box containing any global attribute sets you may have created (E.G. platform). See Setting up atttributes for help on setting these up.
- Once you have selected an attribute from the select box, click add and you will be able to apply the terms attached to that attribute (E.G. Nintendo DS) to the product.
- You can choose to hide the attribute on the frontend by simply leaving the ‘Visible’ checkbox unticked.
- Custom attributes can be applied here too by choosing ‘Custom product attribute’ from the select box. These are added at the product level and won’t be available in the layered navigation.
Grouping tab
The grouping tab lets you assign your simple product to a grouped product if one exists. You can also set the sort order if you want the product to appear in a specific order when viewing the grouped product.
Excerpt
Finally you can add an excerpt which should be a short description of the product. Typically this will appear next to the product imagery on the listing page whilst the long description will appear within the Product Description tab.
Taxonomies
On the right hand side of the Add New Product panel you will see your product categories in which you can place your product, just like a standard Blogpost. You can also assign the product tags in the same manner.
Product images
You can add both a main image and a gallery of images
Adding a grouped product
A grouped product is created in much the same way as a simple product. The only difference in fact is choosing “Grouped” from the Product Type dropdown in the General tab. Upon choosing this the price several fields will disappear, this is fine, you’ll be adding these fields to the individual child products. Once you’re happy with the grouped (parent) product, publish it and come back to the Add New Product page.Now you need to add the child product which sits within the grouped product. The only information you’re required to fill in here is the following:
- Title. E.G. Playstation 3 80 GB
- Product Type (simple)
- Parent post (inside the Group tab). Choose your parent (E.G. Playstation 3) from the selectbox
Adding a virtual product
When adding a simple product, you can check the ‘virtual‘ box in the product type panel. This will remove un-necessary fields (such as dimensions).
Adding a downloadable product
When adding a simple product, you can check the ‘downloadable‘ box in the product type panel. This will add two new fields:
- File path – path or url to your downloadable file.
- Download limit – a limit for the number of times the customer can download the file. Left blank for unlimited downloads.
- For maximum flexibility, downloadable products also incur a shipping cost (if for example you were offering both a packaged version, and a downloadable version of a product this would be ideal).
- You can also check the ‘virtual’ box if the downloadable product is not shippable.
Adding an external product
Choose ‘External/Affiliate’ from the product type drop down. This will remove unnecessary tabs such as tax and inventory and insert a new product URL field. This is the destination at which users can purchase the product. Rather than add to cart buttons, they will see a read more button directing them to this URL.
Adding a variable product
Variable products are arguably the most complex of product types. They let you define variations of a single product where each variation may have a different SKU, price or stock level.[/toggle][toggle title=Managing orders]
Viewing orders
When you start taking orders the order management page will begin to fill up. You can view these orders by going to Commerce > Orders in the left hand admin menu.

Each order row displays useful details such as the customers address, their email, telephone number, and the order status. You can click on the orders number or the ‘view order’ button to see the single order page (this is also where you can edit the order details and update the status).The order statuses let you know how far along the order is, starting from pending and ending with complete. The following order statuses are used:
- Pending – Order received (unpaid)
- Failed – Payment failed or was declined (unpaid)
- Processing – Payment received and stock has been reduced- the order is awaiting fulfilment
- Completed – Order fulfilled and complete – requires not further action
- On-Hold – Awaiting payment – stock is reduced, but you need to confirm payment
- Cancelled – Cancelled by an admin or the customer – no further action required
- Refunded – Refunded by an admin – no further action required
You can filter the list of displayed orders by date, status and customer by using the form at the top of the screen: